Friday, December 21, 2012

Zipper Pouch Sewing Swap


Awhile back, I participated in a sewing swap that was put on by Heather of The Sewing Loft. We could make any kind of purse, pouch, or bag as long as it had a zipper. I used the Open Wide Zipper Pouch tutorial from Anna of Noodlehead. It was so easy to make and there are three different sizes to choose from. I have made a couple other zipper pouches using this same tutorial. My partner's favorite color is red, so I decided to use that color in her bag.

 
I made the small size, which is about 9 x 6 inches tall when finished. It is very roomy too.
 
 
My partner made me this adorable coin purse! I love the colors and it is the perfect size. Now I won't lose all my coins in my purse!
 

 Here's the inside - the lining is very pretty.  
 
I had so much fun participating in this swap! It is just as fun making something for someone as it is receiving something especially if it is a surprise package coming in the mail!
 
~Elizabeth
 

Thursday, December 6, 2012

St. Nicholas Day Surprise

Today, is the feast of St. Nicholas. St. Nicholas was the Bishop of Myra in the third century. He was a very kind and wealthy man, giving much of what he had to the poor and needy. He is the real Santa Claus.

As one story goes, there was a man who had three daughters. In order to get married, they had to have money - a dowry. The man was very poor and did not have any money, so it seemed as though his daughters would be sold into slavery. However, one night a they found a bag of gold by their fireplace. The next night, a second bag of gold was found and then a third. The three daughters had their dowries and would not be sold into slavery. Nicholas was the one who had given the gold to the man and his daughters. That is how the tradition of putting your shoes out on the eve of St. Nicholas Day came about.

Over my Thanksgiving break, I made three zippered pouches for my roommates. I wanted it to be a Christmas gift for them because they are such wonderful roommates! We leave for break before Christmas, so I decided to surprise them with their gifts for St. Nicholas Day. I wrapped their gifts up in pretty paper and decorative gift bags.

Here they are, all packaged up!
Once they leave for school, I will put them in their rooms, and they will have a surprise waiting for them when they get home later today!


Roommate #1 will get this lovely Girlfriend Zipper Pouch. It is just the right size and it even has pockets inside! If you want to make one, you can find the tutorial at Blue Susan Makes. It was super easy and fun too! I love the ruffle detail on the front.


Roommate #2 will get this awesome pencil pouch! It is perfect for her since she wants to be a teacher. The numbers are perfect too, because she loves math! It is super easy to follow and you can find the tutorial at Gwenny Penny. I will be making several more of these!
 
 
Roommate #3 is from South Korea, and she loves anything I sew. She has watched me sew and wants me to teach her! I decided to make her this open wide zipper pouch from Noodlehead. The fun thing about this tutorial is you can choose from 3 different sizes to make. I was going to make a medium but I made a mistake when cutting, so I had to make a small. This is another great tutorial that I will be using again!


 My crafty and thoughtful sister wanted to make something for all of my roommates too. She made these felt Christmas tree ornaments. Aren't they so cute? She did a great job!


I know my roommates will love their surprises! Have you been sewing any Christmas gifts lately?
 
Happy St. Nicholas Day!
 
~Elizabeth
 

Wednesday, December 5, 2012

Sweet N Sour Meat Loaf

A few weeks ago, I signed up for a recipe swap hosted by Ashley, of Chevron Stitches. I was really excited for this swap because I'm always looking for new recipes and I love cooking/baking. I was paired up with Holly from NY (check out her blog here!). She sent me a recipe for Sweet N Sour Meat Loaf, which I was really excited about because meat loaf is one of my favorite things! It's so yummy. However, I have never made it myself. I have only eaten it when my mom makes it for dinner, so this gave me the perfect opportunity to try something new in the kitchen!


The recipe was very easy to make and easy to follow. I just followed everything it said. I did leave out Soy Sauce, however, because I didn't have any. I also used apple cider vinegar instead of plain vinegar, because that's all I had on hand.

Here's the recipe:

Sweet N Sour Meat Loaf

2 cups water
5 TBS brown sugar
5 TBS Vinegar
2 TBS Cornstarch
2 TBS Corn Syrup
2 TBS Soy Sauce
1 TSP Salt

Meat Loaf:
2 eggs
2 Tsp Worcestershire sauce
1 cup bread crumbs
1/2 cup chopped onion
2 tsp salt
1/2 tsp pepper
2 lbs ground beef

Instructions:
In a saucepan combine the first seven ingredients: bring to a boil. Cook and stir for 2 minutes or until thickened. Set aside. In a large bowl, combine the first six meat loaf ingredients: add 2/3 of the reserved sauce and mix well. Add ground beef and mix well. Pat into two greased loaf pans. Pour the remaining sauce over the loaves. Bake, uncovered at 350 degrees for 60 minutes or until meat is no longer pink and thermometer reaches 160 degrees. Let stand 10 minutes before slicing.

The meat loaf was so delicious!! My roommates came home as it was cooking in the oven and they said it smelled so good! They both tried it and really liked it too.
Thanks for the recipe Holly! I will definetely be making this again. It was so delicious and easy to make!


~Elizabeth

Monday, December 3, 2012

Giveaway Day is Here! {Closed}

This giveaway is now closed! Thank you to everyone who participated! I was amazed at all the response I got and I enjoyed reading every comment.
Congratulations to Leigh and Carol, the two giveaway winners! I have sent you both an email.


Today is Giveaway Day at the Sew Mama Sew blog. I am so excited to be participating this year, as this is also my very first blog giveaway! For my giveaway, I have two rice bags for two lucky winners. Rice bags are great for keeping warm, or for aches and pains. You can warm them up in the microwave to use as heating pads, or you can freeze them for ice packs. I like using them at night to warm my bed up so my feet don't get cold. They are functional and pretty!

The big one is 10 by 7 inches and the small one is 6 by 6 inches.

 
This is the other side of the small rice bag.

You can see the size difference here.


Details:
 
-Giveaway open to US residents only.  
-Giveaway open until Friday, December 7th at 7 p.m. CST.  
-I will choose two winners - one will win the big rice bag, the other will win the small one.
-Winners will be selected randomly and announced here on Sunday, December 9th.
-To enter, simply leave a comment answering this question: What is your favorite Christmas tradition?
-Also, make sure I have a way to contact you if you win.
 
Don't forget to check out all the other awesome giveaways at Sew Mama Sew today!


~Elizabeth
 

Friday, November 30, 2012

Giveaway Day at Sew Mama Sew

Giveaway Day will soon be here! It is a biannual event at the Sew Mama Sew blog where bloggers and shops can link up their giveaways. I have entered giveaways in the past for giveaway day. This year, I have decided to participate in giveaway day by hosting a giveaway!

 
Giveaway Day will be December 3rd, so make sure you come back here for my giveaway and that you check out all the other great giveaways. There is more information here too.

~Elizabeth

Thursday, November 29, 2012

Black Friday Finds and Some Thrifting

Hello Everyone! I hope you all had a wonderful Thanksgiving! I know I did! I spent it at home with my family, worked a couple of days and didn't even open my textbooks. These next couple of weeks before finals will be spent studying hard though and then I get a month long break! Yay!

On Black Friday, I went shopping with my mom and sisters but we waited until late morning. We went to Joann Fabrics, Kohl's and Target.

At Joanns I found some fleece, zippers, and interfacing. There was a great deal on interfacing, so I bought five yards. The fleece was on sale for a really good price too (somewhere around $4/yd). I bought some zebra print and solid blue fleece to make a gift for a friend.

 
The next stop was Kohl's. I was looking for some fashion boots that would look nice with skirts and would also be comfortable. I found some that were the last pair in my size!


Target didn't have a lot of deals, but I did find some mustard colored tights and fleece-lined leggings. The fleece leggings are so warm to wear in the cold weather under my skirts! I also found a frying pan because none of my roommates have one big enough to cook anything in and we cook fairly often.
 
When I was home over the Thanksgiving break, I went to check out a new thrift store that has just opened in our town. They have clothes, games, shoes, some toys and games, and some antiques. The antique stuff is priced higher but the clothes are very reasonable. I found two things for myself and one thing for my sister.
 
 
Isn't this a beautiful sweater? I bought it for my 9 year old sister and it fits her perfectly. It was only $5.
 
 
I found this sweater for myself. It was $2.


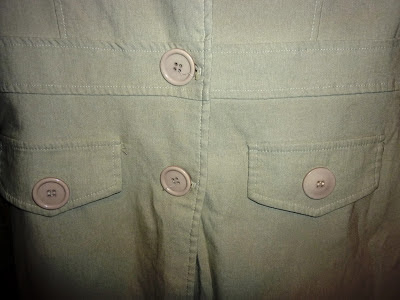
This jacket was only $5 and it is a forever 21 brand. The hem on one sleeve is undone, but that's something I can easily fix.
 
Did you go Black Friday shopping? I'd love to hear what kind of deals you found!

~Elizabeth

Thursday, November 22, 2012

Happy Thanksgiving!

 
A friend shared this on facebook and I'm sharing it here because it made me smile. :)

I have been blessed in so many ways this past year and I have so much to be thankful for. I’m so thankful for my loving, supportive parents and my amazing siblings. I’m grateful to have this week off of school to spend time with them. I am thankful for my faith.

I’m thankful for the ability to run and walk and for plenty of food each day. I am also thankful for sewing and fabric, of course; my friends, my wonderful roommates, my job, my education and the beautiful weather.

I am thankful for all of YOU - my blog readers! Thank you for reading my blog. I am so grateful for the friends I have made in the blogosphere and to be able to share my sewing adventures with you.

Have a wonderful Thanksgiving spending it with your family and eating good food.

Happy Thanksgiving Everyone!!


~Elizabeth


Friday, November 2, 2012

Polka Dots and Denim

Hello everyone! A couple weeks ago, I was shopping at Joann Fabrics when I came across this:


White polka dots on denim! As soon as I saw it, I was already imagining a cute denim skirt that would be perfect for fall/winter weather! I knew the perfect pattern to use. I had to have it! It was a fashion denim, so it was more expensive than plain denim, but it was 40% off, so  I didn't feel too guilty buying it.

After buying the fabric, it sat for awhile because I had no time to sew. Then, a couple weeks ago there were no classes! I could use that day to sew my skirt!

I used the Route 66 skirt pattern from the Long ladies at marie-madeline studio. This was my third time using the pattern, and I love it. The instructions are very easy to follow and everything is written in a way that is easy to understand. I think it is a good pattern for seamstresses of all skill levels.

Since I was making this in my apartment at school, I cut it out in the living room, because there was more space there than in my bedroom.

 
This was before cutting anything out. There are only two pattern pieces. The gore piece and the facing piece. The skirt is made up of twelve gores and it comes in sizes 2-18.
 
 
This is what my fabric looked like after I cut everything out. I thought it looked funny, so I took a picture! The pattern requires 2 3/4 yards for the mid-calf skirt I made.
 
The skirt only took me 6 hours to make! I started in the morning, and I only stopped for lunch. When I start something, I have a hard time stopping in the middle.
 
Here's my finished skirt!


The skirt has an invisible zipper:
 
 
I still need a lot of practice with invisible zippers, but I'm getting better. Without this tutorial, I would be lost! Kay Whitt does a wonderful job showing you how to put in an invisible zipper with a regular zipper foot.
 
I love everything about my new skirt. It is the perfect length and the gores make it nice and full at the bottom but narrow at the waist, providing a flattering fit.


Didn't my sister do a great job with these photos? We had a lot of fun taking these pictures at the park!
 
 
This will be the perfect skirt for the fall and winter! It can be worn as a casual everyday skirt or you can dress it up for more formal events. It is a very comfortable skirt and I know it will get lots of wear!
 
Have you ever made a Route 66 skirt? Or a denim skirt?
 
~Elizabeth

Friday, October 26, 2012

Exciting News

Hi everyone! This is just a quick post to share some exciting news with you. Today, I got my letter of acceptance for the Nursing Program at my school!!!!! It made my day! I am so excited!! This means I will start the Nursing Program in spring 2013. It will be a lot of work, but I am really excited to start all my classes for my major.

Nursing School, here I come!!!!!!!!!!!!!!!!!!

Have a wonderful night, everyone!

~Elizabeth

Saturday, October 20, 2012

A Wedding Gift

Happy Saturday everyone! A couple of weeks ago, my friend got married. The wedding was in another state, so I didn't go, but I wanted to make her something. After a lot of thinking, I finally decided on cloth napkins. They are practical, pretty, and are a perfect wedding gift. My friend's favorite colors are baby blue and baby pink, so off I went to look through my stash. I didn't find those exact colors, but I did my best.

Originally I was going to cut big squares and hem the edges, but then I thought, why not make reversible napkins? It would be like two in one! I made two napkins for each set, so four napkins all together, but since they are reversible, it is like having eight.

 
The first set is red on one side and has leaves/flowers on the other side. I thought it would be a good set to have for fall.


I used baby blue on one side for the second set and I used a fun print for the other side.


The first set is 18 x 18 inches and the second set is 15 x 15 inches.
 
 
I made a cute label with her favorite colors and tied the napkins with a ribbon. I found the "Everyday Napkins" saying here, from this tutorial that I had planned on using before I decided to make them reversible.
 
I love how these napkins turned out! They will make my friend's new home very pretty! They were so quick and easy to make and I will definitely be making more for future gifts.
 
~Elizabeth
 

Thursday, October 18, 2012

Guest Post: DIY Design at Home, by Alexandra


Hello everyone! Today, I'm excited to share a guest post from Alexandra of  Alex's Journeys. She is the first guest poster on my blog, so I hope you enjoy!
 
Living in Brooklyn, especially a place like Williamsburg, means that the space you can afford to live in might be pretty close quarters. Luckily, there are a ton of do it yourself projects that can improve the interior design of your Williamsburg loft and add tons of elements of personality to your flat. Those bland white walls don't have to stay white or empty, and Brooklyn Flea one of the best flea markets in the area, can provide you with a ton of adorable decorating options for a really reasonable price. Do not let yourself get stuck living in a boring apartment, just get to work on some do it yourself design.

One great way to open up a small apartment or loft is an accent wall. Choose a color that compliments your taste or the main furniture pieces you already have and go to town. This kind of wall looks particularly good and opens up a room considerably more when it is at the far end of the room. Having your couch or loveseat on the opposite wall will allow you to enjoy the color all the time, not just when you first walk into the room.
 

Check out Brooklyn Flea and start a collection of vintage glass bottles and candle holders in a variety of colors. Arrange them in rows and clusters on your window sill, and watch as they function as sun catchers, spreading pretty patterns on the wall during the sunrise and sunset. They add a burst of color to an otherwise dull room. Vintage scarves are also great to drape around curtain rods or place over open surfaces like windowsills and shelves. They add a colorful and esoteric feel to a room.

While you are at the flea market, look for old prints that are interesting and cool. Even vintage record covers can be great for this. Matting your own artwork is really simple and cheap and requires little more effort than a trip to the art store for some mats and a jug of mod podge. You can use sticky tack to hang your new prints so that you do not do any wall damage and wind up losing your security deposit.

If you are someone who likes sewing, scour the flea market or even your mom or grandma's closet for some vintage pillowcases that you can turn into new throw pillows. Just cut the cases to your preferred size, cut them inside out, sew the hem about halfway, turn it right side out, stuff it with cotton batting, fold the hem in, and sew it the rest of the way up. These pillows do not have to coordinate to look cool and fun.

There are plenty of ways to dress up your space loft all by yourself without breaking the bank and still having a place that is unique and all your own. All you need is your sense of style, a little legwork and the willingness to make your flat your very own special space.

Alexandra is a travel enthusiast who loves to write about fashion, beaches, food, and the wonderful things in the world.  She provides her own insights on vacationing to the blogosphere.  If you would like to learn more about her, follow her @alexsjourneys or visit her blog alexjourneys.wordpress.com

Friday, October 12, 2012

Sewing and Reading

What's better than sewing and reading? A book about sewing! A fiction murder mystery, that takes place in the south and involves sewing, to be exact. What could be better than that?

I love to read. However, this summer I was having a hard time finding a book I enjoyed, other than ones I have already read. So, I went online and searched "sewing fiction books." One of the first things I found from this search was the Southern Sewing Circle Mystery Series, by Elizabeth Lynn Casey. Just looking at the names of the books got me interested (Sew Deadly, Death Threads, Pinned for Murder).


I am now on Book number 4, "Deadly Notions," and I plan to read all of them. They are such a fun read and I love the characters. Each book provides you with the opportunity to get to know the characters a little more. It takes place in the south and is about a group of friends who all share a love of sewing. I love the series for the sewing aspect, and also for the close knit friendships that are formed. These sewing circle women show you what true friendship is both through thick and thin.


The first book starts out when Tori Sinclair moves to Sweet Briar, North Carolina for a job at the library. Sweet Briar is a small town, and soon everyone is talking about her. Leona Elkin is one of the first friends she makes and who helps her adjust to the ways of the south. Soon, she wins over the ladies of the sewing circle and shares her new ideas for the library. Just as she seems to be settling in, a murder takes place and it doesn't look good for her, as she is new in town. Will her new friends help her or will they turn against her?

The books are suspenseful, funny, interesting, and keeps you guessing until the end. You won't be disappointed. You can read more about the books at the author's website, here.

Another thing I love about these books is the sewing tips and sewing project at the end. There are instructions for making a similar project of what Tori and her sewing group worked on in that book. In "Pinned For Murder," the Sweet Briar Sewing Circle made hats and scarves for a women's shelter. I decided to try my hand at making a hat a scarf, and it is probably one of the easiest projects I have ever made!

Here's the scarf:


Basically, you just layer four fleece rectangles, sew down the middle and make cuts every 1 inch on both sides. Then you fluff it out and you have nice warm scarf!


The hat was very simple too. You just cut one rectangle, folded the rectangle in half and sewed all but 4 inches on the side. Then turning it right side out, you cut fringes on the part you did not sew and tied it off.


They are both very warm and I know I will get a lot of use out of them this winter. I would really like to make a bunch of them for some type of  service project like Tori and her friends did in the book.

Do you have any book recommendations? Let me know what you think if you decide to read this series!

~Elizabeth