Saturday, November 18, 2023

Project Night and Day with PRP


Project Run and Play has a new pattern collection and I am so excited to share with you what I sewed! I helped with testing of the Celestial Dress so that was an easy pick to sew for the pattern tour and I focused my whole look on that pattern and fabric. The pattern is beautiful with princess seams and choice of three skirt lengths, two sleeve options, and a zippered back. 


The fabric is from my stash and I have had it probably since my college years. I remember finding it at Goodwill but I never knew what to make with it. I'm glad I saved it until now! It is a chiffon and it was perfect for this dress.


I decided to add the lace after the dress was completed but it really elevates the look! It was easy to just pin the lace on to the princess seams and sew it down but the bodice really gives you options for sprucing it up for a fancier occasion!


At first I was only going to do two tiers on the dress but decided last minute to do three tiers and I really love how it looks! Hopefully it will fit my daughter for a long time too since she is tall!


I also chose to make the flowy sleeves which I think are so fun!


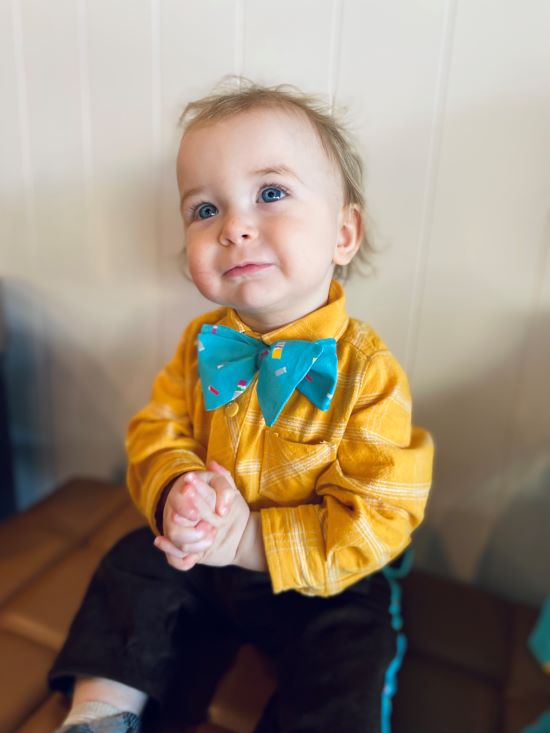
Next is the outfit I sewed for my son! I wanted his outfit to coordinate with my daughter's for a "fancier night" outfit. I found the yellow plaid at Hobby Lobby. It is a cotton linen and it wasn't my first choice but it matched well with the yellow in my daughter's dress. 


Isn't he just adorable?! I may be biased but try to convince me otherwise. I've been wanting to make him a button down shirt for awhile and the Sunset Shirt from the new pattern collection was perfect! I chose long sleeves, regular collar, and the snap crotch version. The snap crotch is the perfect choice for a little boy on the move because his shirt stays tucked in! I also chose to do snaps instead of buttons for the rest of the shirt because it was faster. 


The bowtie is also from the pattern collection and it is the Outer Space Ties pattern. There is the option for a regular necktie or the adorable bowtie. I made the bowtie with the optional adjustable neck with velcro since my little guy is only one and I want to be able to put it on or remove it easily. 

I used the same fabric from his sister's dress so they could be matching. 


To complete his outfit, I made the Fete Slacks which are also from the Project Run & Play shop but they are not from the new pattern collection. I chose to make these pants because the pants in the new collection did not go down to small enough sizing for my little guy. 

I made the pants with the elastic back, flat front option and instead of a fly I made a faux fly. That is not in the pattern but it is an easy adjustment to make. I did not want to put in the work for a real fly when my baby won't appreciate all that work, haha! 


I did do the contrasting tuxedo stripe option which is included in the pattern to make the pants a bit more formal and to really tie it in with my other pieces by using the same fabric from the bowtie and dress. 


We went to our favorite local coffee shop for pictures. It was one way to get my 2.5 year old to take pictures because she loves getting the babyccino drink! She also knows where the coffee shop is when we drive by so it's hard to say no because I also enjoy going!


Could they be any cuter?!

I had so much fun sewing these patterns for Project Run and Play and their new Project Night and Day collection! Check out the Project Run & Play blog to see what everyone else created and check out the store to see all the patterns in the collection

Finally, I will leave you with some bloopers from out photo shoot because it is incredibly difficult taking photos of a 2.5 year old and a 1 year old! 


Here she was saying, "I just want my latte!"


I had so much fun sewing these outfits! I hope you enjoyed reading about and seeing my photos! Thank you to the ladies at Project Run & Play for inviting me to be a part of the tour!


 ~Elizabeth

Monday, September 4, 2023

Project Run and Play Mini Season 3 // Cherry Berry Cute!

Hello! I have not blogged in ages but I am so excited to be back and sewing for Mini Season 3 of Project Run & Play! I got asked to participate back in July and immediately said yes! It was a dream come true the first time way back in 2017 when I was a part of Season 14 and I am glad to be back again for this mini season. 

This time there are six former contestants and they paired us up for three weeks of head to head competition. The theme was pretty open with "Copy that Look." Before getting to my look I have to say I am so grateful for PR&P. This challenge has given me a chance to stretch my sewing skills and knowledge and make some outfits for my kids that I would have otherwise never made!


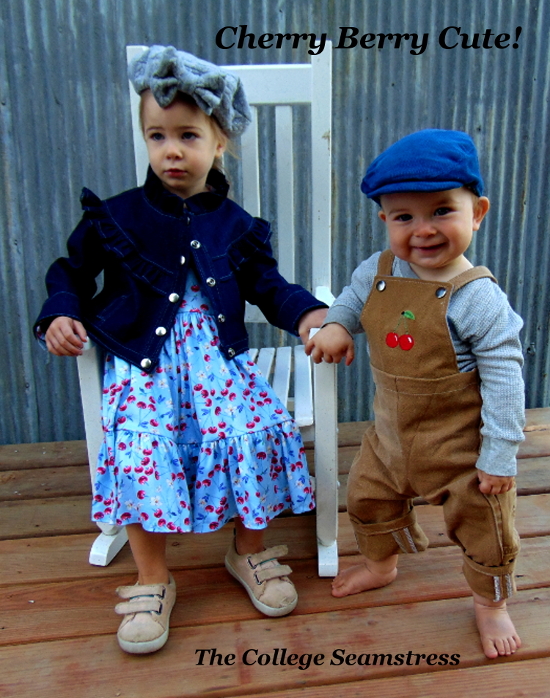
My whole look started with the "American Honey" fabric from Raspberry Creek Fabrics. I knew I wanted to make a dress and so I browsed Janie and Jack website, a classic children's clothing company. My kids are 2 and 10.5 months and I knew I wanted to make something classic and timeless. I found some super cute items to "Copy that Look". My inspiration for the dress was based off this Every Day Puff Sleeve Dress. It had everything a little girl could want - puff sleeves, a scoop back, and a twirly tiered skirt. I started with the Janie Dress pattern from the Project Run & Play shop. I used the bodice with the scoop back but I made a neck binding and changed the sleeves to be puffed using this tutorial from Elizabeth Made This. I went all out on the puffs making them something Anne Shirley would be proud to wear!


The skirt is two tiers. I measured my daughter to figure out how long I wanted the skirt to be from waist to hem. Then I divided that up into two pieces making the top tier a little bit wider than the bottom tier. I doubled the length so there was plenty of gathering making a very twirly skirt!


The sleeves are my favorite part of the dress and they were so much fun to make. 


The jacket was a labor of love and the piece I am most proud of. I was first inspired by the Janie and Jack Ruffle Trim Denim Jacket. The ruffle reminded me of the Sofiona Designs Raven Dress so I started with that and used the yoke piece to redraw my own yoke onto the bodice of a Friday Dress. I made a ruffle twice the length I needed for the yoke and the collar and gathered it. The bottom of the jacket is the Fashionista Jean Jacket but I cut it apart several times and redrew the back and front panels to look more like my inspiration jacket. The only original pattern pieces are the plackets, sleeve cuffs, welt pockets, and bottom band. The fabric is a Cone Mills stretch denim that I've been saving for years for the right project and I guess this was it!


The back yoke is also something I am proud of. I decided to tie in the cherries from the dress to the back of the jacket by hand embroidering some cherries. I found a free template from Oh Sew Bootiful and traced that onto my yoke before I started sewing. I embroidered the cherries and love the pop of color against the denim jacket. My daughter loves it too and says "look at my cherries!" every time she wears the jacket. 


I was able to get some custom print fabric from Raspberry Creek Fabrics so I could match the inside yoke and inside cuff to my daughter's dress. I love the little details even though no one will see them. 


The hat is a Monet Beret from the Project Run & Play shop and I added a bow. I wanted to use a sweater because my inspiration was this Sweater Beret from Janie and Jack. The best I could find was this cable look fabric from Esty. I still think it turned out pretty cute! It is a knit so I interfaced the outer fabric before sewing so it wouldn't flop around. I love how it really completes the look.


Next, I decided to make an outfit for my baby boy! I found these embroidered overalls from Janie and Jack and that's how I decided to make him some embroidered overalls with the same cherry pattern as my toddler so they could be kind of matching. I used the Flying Fox Overalls from the Project Run and Play shop. I omitted the front pockets but added a little back pocket. The fabric for the overalls was my husband's old work pants and I love seeing our son wear it now. My husband was happy to see his old pants get new life too! I added some embroidery to the back to cover up some holes in the fabric too.


I wanted to make a Henley shirt to go under the overalls but instead of a real placket I made a faux placket. In hindsight I should have made a real placket because my baby boy has a big head! I was able to fix it by lowering the neckline and it is easy to get on and off now. I used the Oliver + S School Bus T-shirt with the only changes being the faux placket, a wider neckline, and adding sleeve cuffs instead of hemming. The fabric for the shirt is also upcycled as it was my husband's old shirt. I used the original sleeve cuffs and neckband from my husband's shirt too. It looks so cute now! 


Finally, since my daughter had a hat, I wanted to make my son a hat as well. I used the Fell & Dale Cap from the Project Run and Play shop. I used a corduroy fabric from my stash to make it similar to my inspiration photo. My son doesn't usually like hats but he didn't touch this one the entire photo shoot! He also wore it grocery shopping with me last week and kept it on the whole time. Everyone thought he was so cute and he just had the biggest smile while wearing the hat! I think I need to make him one to match every outfit now. 


Thank you so much for letting me share this and thank you again to the Project Run and Play team for inviting me back for a mini season! I never thought I would be sewing for my own kids for a Project Run and Play competition but here we are and it was so much fun!


I thought it would be fun to add all the inspiration items to the shopping cart and my total price had I bought all these outfits would have come to $236 (and some of those items were on sale)!! Sewing can get expensive but you can also save a ton of money especially when sewing for kids! The only fabric I bought for this project was the fabric for the dress and the beret. Everything else I had in my stash.  


Go VOTE for your favorite look this week. This is the third and final round in this mini season and everyone's designs have been amazing! You can still participate in the sew along until 9/14/23 and all the details for that are here


 ~Elizabeth

Thursday, October 8, 2020

Three Bonfire Hoodies // Sofiona Designs

 Happy October! It is my favorite time of the year for many reasons, including the cooler weather and changing fall colors! It also means I can wear all my favorite cozy cardigans and hoodies. I have a new favorite hoodie to share - the Bonfire Hoodie by Sofiona Designs. I might be wearing this all of the fall season because it is so comfortable!


Sofiona Designs actually has two separate patterns, the original girls Bonfire Hoodie and the women's Miss Bonfire Hoodie. It only made sense to sew both versions so my sisters could have a new hoodie too! I think they look so cute in their Bonfires!


One of my favorite things about this pattern is all the details! Yes, it does make it a fairly involved project and it is not a quick sew (especially if you decide to make three at once like me!) but the end result is so worth it. My 17 year old sister and I chose to have thumbhole cuffs on our hoodies, but my littlest sister wanted normal cuffs. I love how you can totally customize the details to make the hoodie of your dreams. 


Other options this pattern includes are an accent strip on the front and back bodice, a hidden front pocket, and drawstrings. The hood and bodice are lined as well. 


This pattern was released about a year ago and I knew it was a pattern I had to have right away. I even bought fabric from Raspberry Creek Fabrics right away too. The fabric and patterns sat untouched in my sewing room until these last few weeks when I decided the hoodies must be made immediately! 


I think all the little details really add to the quality of the Bonfire Hoodie. The eyelets/drawstrings took more time, but I am so happy with what they add to the overall finished look. I just used strips of leftover fabric to make the drawstrings because that way they matched the hoodies and I didn't have to buy anything else. 

Funny story, I was upset when I was cutting these out because it took all afternoon and I almost didn't have enough fabric. I had to play some serious pattern cutting jenga and even then it was close! I didn't quite have fabric long enough for the drawstrings and hood facings but I had enough smaller pieces. My husband is a welder and he suggested I "weld" smaller pieces together to make a piece big enough. I was being stubborn and didn't want to do that, but in the end that is what I did and it worked out just fine! 


We love the huge hidden pockets! 

The fabric is all from my favorite fabric shop, Raspberry Creek Fabrics. I thought I had ordered all French Terry but I ordered the floral in cotton lyrca by mistake. The pattern calls for heavier weight fabrics, which is why I wanted to use French Terry, but the cotton lyrca works just fine too. I love the pop of floral with the darker solid colors. 


I made the girls Bonfire for my littlest sister and the Miss Bonfire for my other sister and I. The Miss Bonfire Hoodie comes with cup sizes for the bodice and there is the option to print the pattern in layers, which makes blending sizes super easy. The size chart said I should have made a size 8, A cup bodice but I ended up using the size 8, B cup bodice because I felt the finished measurements were closer to what would work for me. I also blended out at the waist and hips for both my sister and I. For my littlest sister I used one size for the width and another size for the length because she is so tall. I love being able to sew my own clothes so I can make them fit how I want. 


Here's a detail shot of the thumbhole cuffs. I love how the thumbholes are hidden when not putting your thumb through. The construction is really unique compared to other patterns I've made but I think I prefer it this way! 

And now for some outtakes! My sisters are so silly and we had so much fun taking these pictures at our local apple orchard!


~Elizabeth